Tom Z thread on basic set-up of the helicopter
Finless Bob has video on set up on helifreak.com.
Stock is 200mah 6grams. Use Hyperion CX 240mah for best performance. Max battery size that will fit is Zippy 350 mah for long run time 9.25grams 2g heavier and 4mm longer. Hyperion CX 320 mah will not fit. See post here. Zippy 350 is heavier, and may be too heavy for 3D.
If you are going brushless with the C05 motor, stock 200mah battery will not hold out beyond 75% throttle. Voltage drops too much at 100% throttle. Use Hyperion 240 like many people do.
For 350mah batteries, use these. They can get up to 10 minutes of flight time. Can also get 350mah at helipad.com. Waklera 350mah also fits.
nanos from Hobby King are good and cheap also. Use the nano tech 300mah.
The stock Genius servos are strong enough for crashes when doing easy flying. When you are flying aggressive or when doing 3D, and crash, chances are the gear next to the output in the servo will strip a teeth. Two things you can do:
1. Rotate the gear to an area that has not been stripped.
2. Don't strip the gears in the first place by doing a servo saver mod.
Here is how to rotate the gear to a new area: Open up the upper cover of the stock Genius servo, and check which gear is broken. Usually is the big ones that don't rotate that much. If that is the case, just slightly separate the gears by force, and rotate to a good portion of the gear. You can reuse a broken gear 2, 3 even 4 times if you rotate them a little to a new section each time.
Other servos can work on the Genius. Is not easy or pretty, but can eventually be fitted to the Genius. Here are some info for reference. Not recommend anyone do this. Is not worth it IMHO.
Servo Gear Replacement: (They may be sold out already - Don't know when there is restock)
All standard servos work on the Genius. Therefore, you may be able to use iFlight, or Hobby King. The stock servo is 2.46g,
HK-5320 from hobby king is only 1.7g. This one should fit Genius ok, but will need to reverse the servo. To do that, you will need to reverse the red and black wire on the pot, and the swap the motor wire. See post here. This one is the best bet to fit the Genius. Will only need spacer since the servo is shorter than the stock.
HobbyKing HK-282A 2g .08/60deg,.2kg*cm - Need to swap the red and black wire.-Servo may be slower than stock. Slight sanding to fit. Slilghtly heavier than stock. From Helifreak, this one is very hard to modify to fit Genius. The mounting tabs are in the wrong location. See post of it installed here. This is the most difficult to fit to Genius.
HobbyKing HK-282 2.2g .08/60deg, .2kg*cm - This one is glue together, but very similar to HK-282A.
Fix tail drift: Use throttle to rudder mix to solve the yaw issue. See post , or here. On this helicopter, no matter what trim you set to compensate for tail yaw drift, the next time you start up, the helicopter will take the new transmitter position as neutral. Trim does not work for tail motor. Therefore, to "trick" the helicopter, set trim for 0. Use throttle to tail mixing. Set the mix so that there is no tail offset with no throttle. This way, when you boot up helicopter, receiver does not see any offset, and use 0 as neutral. Set the mixing so that as soon as throttle is move away from 0, there is a tail offset to compensate for any tail drift.
Fix instability in 6 axis mode: Helicopter drifts to the left, and full right stick cannot correct for it. See page here.
Best explaination for trimming those elevator and aileron gyro sensitivity pots. (The 2 towards the front)
Throttle hold issue on V1.
Tail rotor blow out from worst to best:
Stock is not good with brushless or some 3D manuvers.
Can use a blow dryer to curve the tail blade some more for performance. Beaware that this puts more load on the motor, and may shorten the life. Nothing is free.
Use MCPx V3 tail for better performance. (But have to buy the entire tail assembly for $14.
Increasing the pitch of the tail rotor works, but loads up the tail motor, and shorten the motor life.
Nine Eagles Solo Pro blade holds better than MCPx V3 tail.
Modify stock tail by shortening the rotor, then remove some pitch. (Mod video taken off YouTube)
Use KDBB tail rotor from helidirect.
Wobbling helicopter - Due to crack on head.
Glitch cause by not grounding brushless motor
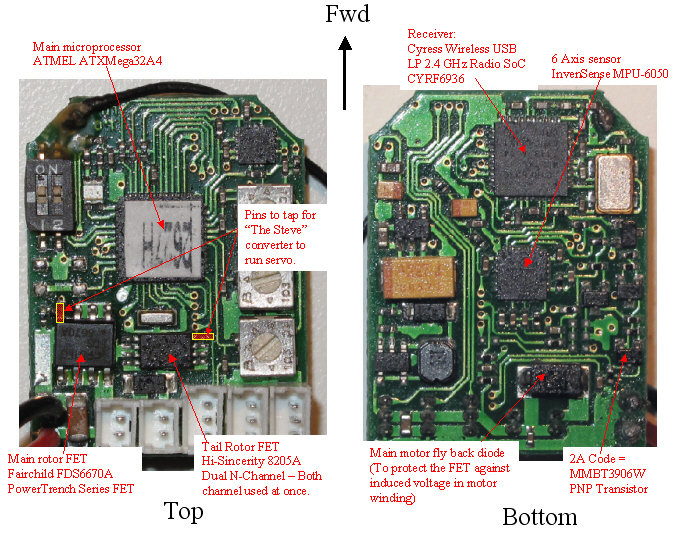
What chip does Walkera use for the 6 axis. InvenSense MPU-6000/6050. Unfortunately, the solder pads on that chip is under the chip. Hard to solder for DIY who wants to experiment with 6 axis. For 6050, pin 8 requires a bypass capacitor while 6000 does not. Genius has a bypass capacitor, so is the 6050 chip. Datasheet
Genius microprocessor best as I can tell use ATMEL ATxmega32A4 - Data sheet. Port C and Port E support TWI communication. The 6 axis chip connects to pin 28 and 29, which are PE0 and PE1. Therefore, the 6 axis chip communicates with TWI (I^2C) to Port E. Can buy one here.
The FET used on the Genius main rotor is FDS6670A. See post. This is actually a high quality FET. One of the lowest resistance FET out there, and has the latest technology.
The tail rotor FET is the 8205A from Hi-Sincerity. That one would be hard to find in the States. Know that it use TSSOP-8 housing 3mm width, and is a N channel FET 20 volts and 5 amps. Can look up similar FET that use a TSSOP-8 3mm wide housing.
What radio to get: Devo 6 and Devo 8 have color screens. Devo 7 is bare bones model with no graphics. Devo 6 is small, but has brighter screen for better viewing. People complain about Devo 8 in the sun.
Get the new canopy that is suppose to be crash proof.
What are the 2 allen wrench for. "There should be two Allen wrenches in your little parts bag that came with the Genius.. You put one on each screw in the head and hope that they didn't use much LocTite and unscrew them.." - livonia bob
Is there a difference between DEVO 6 and 8 since 6 is so small?. Power output is same for 6 and 8.
Landing gear strengthening: Landing gear is the perpetual weak spot on the Genius. There are many modifications to it. Here are some simple ones:
- The best landing gear modification is here. This is my solution, so I can be biased. Still, is probably the best out there.
--Coat the gear with liquid electrical tape. (Home Depot usually have them)
--Best idea is put scotch tape across the two skids to keep them from spreading apart and breaking during hard landing. From livoniabob.
Install landing gear from Nine Eagles 180D by bobepine. Slightly heavy at 2.78 grams more. Need to trim canopy, but at least you don't have to replace the frame. Maybe good as a makeshif gear if you have a spare one handy.
How to install the grommet in the cannopy.
Stiffen the rear frame. heavier in the back helps with cg especially with 240mah hyperion battery.
Stiffen the frame next to the servo.
Servo Replacement: Stock servos are pretty expensive. Here are some alternatives: Conclusion is so far, no replacement servo is an easy drop in. Best bet is to rotate the gear to a good section.
Here is a discussion on Helifreak.
Use 4#3 servo gears to replace stripped gears if you have any 4#3 servos left.
Feathering shaft and o-ring replacement for the feathering shaft. There is no o-ring replacement, get the entire shaft. Or get from here. P/N: HM-V100D03BL-Z-15
Tighten the head with shim from 450 helicopter washer TL2689 and #003 o-ring - 90durometer. See post.
There is no fixed ID for the Genius. There is fixed ID for the 2801 radio, but only if you use the 2801 receiver and not the Genius receiver.
To reset fixed ID for the DEVO receiver, plug the bind plug into the ELE servo port. That is the the one on the outer edge of the board opposite side to the battery connection. Plug battery onto the receiver and wait for the blinking light to blink slowly. That will erase the fixed ID. All the binding plug does is to connect the red (positive) wire with the white (signal) wire. Be sure not to reverse and force fit the plug in. You will connect the red and black wire that results in smoke.
Reciever servo port assignments: Starting from the outter plug opposite to the batter plug: 1. Pitch servo. (The servon in front). 2. Aileron servo. (The one on the left) 3. Pitch servo. (The one on the right) 4. Tail motor. 5. Main motor.
Cracked Canopy: Spread Shoeglue or Goop on inside of canopy. (That is what R/C car racers do with they cracked polycarbonate bodies) Press a piece of packaging tape over the Shoeglue before it drys to further reinforce it.
Stiffen the frame: The Genius frame is actually quite flexible. Stiffen it with carbon fiber from rcfoam.com or similar.
Main blade screws get stripped: Use liquid bandage.
Get just the feathering shaft for the rotor head: oomodel.
Clean the bearings with Bearing Blaster tool. Be warned! When using high power solvant, be sure to protect your hand and fingers so over the years, it does not dry out to an ugly mess.
Fixing vibration issue: Carbon fiber main shaft can bend at the top to cause mysterious vibrations. Also check for tracking of the blades.
Head can get loose on main shaft. Use larger screw.